Monday, June 10, 2013

Ladybug First Birthday Party

Our little girl is turning one tomorrow, but we had her party this weekend!

I started planning for her first birthday a few months ago. I did my best to keep costs down by holding the party at our house and by sending out email invitations. My Mom and I made all of the food ourselves and bought party supplies at the dollar store and Party City. I used Pinterest as a guide to help me figure out how to make a Ladybug cake and I got some other easy ideas from there, as well.

Two months ago, I sent out the invites:


After that, I planned our menu and our decorations. I'm a scrapbooker so I have a lot of tools at my disposal that are already in my craft room. I already owned all of the cutting and gluing tools, as well as most of the paper I needed for her party. I purchased one pack of red paper that I will end up using on some future scrapbooking pages.

I bought 2 red tablecloths from Party City and cut out 1 3/4" black paper dots that I glued onto the tablecloths to make them fit the ladybug theme. This is the only photo of the tablecloth I have as I forgot to take pictures of the food after it was out. It cracks me up since the cake blends right into the tablecloth.

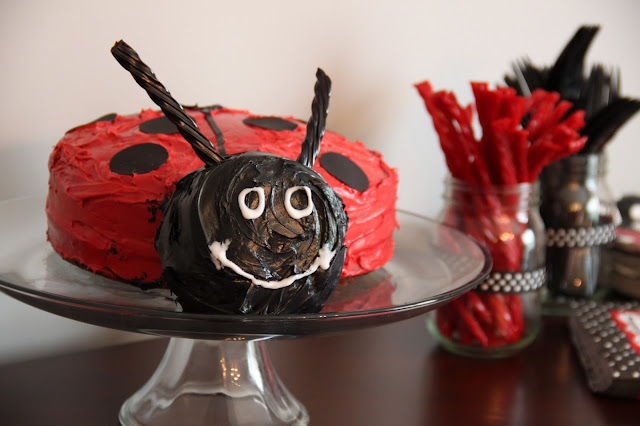
I made a chocolate cake in two 8" cake pans and used a small cake pan I found at Michael's for the ladybug's head. I used red and black frosting color to color white icing. The black dots on the ladybug are from sugar paper that I cut with my 1 3/4" punch. I used twizzlers for the antenna and white writing icing for the face. I am not a cake decorator, obviously, but I am happy with how it came out. 

I baked sugar cookies and used a ladybug shaped cookie cutter to cut out the cookies. The icing is red cookie icing and black writing icing. Next time I would use black cookie icing because the black icing didn't harden which meant it smeared when people put them in the to go bags. These were our party favors.

I used the Cricut to cut out the banner. The banner took me about 2.5 hours to complete. The longest part was waiting for the Cricut to cut out those black circles with the dots in them.

I bought a roll of black and white polka dot ribbon that I used to string up her monthly photos and to put on ball jars I already owned that held forks and Twizzlers (in red and black, of course).


For the smash cake, I used the same pan I made the ladybug head with and baked yellow cake in it twice so I could make her her very own layer cake. The frosting was the same frosting I used on the cake for everyone else. We did not light the candle, which I'm happy about because the minute she saw that candle sticking up, she grabbed it and stuck it in her mouth!

We had hot dogs, hamburgers and sausages on the grill. My Mom made potato salad and coleslaw. We also had chips and dip, goldfish and pretzels for snacking. We set up a table outside with a cooler of beer and lemonade. Inside, we had water, wine and tea.

For the kids, we had a water table and a ball pit set up outside. We had kids aged 8 months to 5 years at our house and every single one of them enjoyed the ball pit. The 18 month old spent most of her time in front of the water table, dumping water down the front of her dress. :)


The only thing I think I would change is giving the birthday girl her cake a little earlier. She was tired by the time we put it in front of her and after a few handfuls of cake, she took her hands, full of icing, and rubbed all that icing into her eyes. That ended the fun quickly! Thankfully, my Mom was there to help cut the big cake for the rest of our guests while I cleaned up the party girl.


I borrowed both of the outfits she wore to the her party on Saturday. Since the dress was borrowed, I stripped it off of her as soon as we were done singing happy birthday so she wouldn't smear red frosting all over it.

Tuesday, June 4, 2013

Thoughtful Gifts

I'm lucky enough to be involved with a group of women who all had babies around the same time that I did. They have been such a wonderful group to talk to as our daughter has grown in her first year and I'm lucky to call them all friends. We did a birthday swap this year so each of us got another baby in the group to send a birthday gift to. One thing I have tried to do recently is give thoughtful gifts over something that may get used once or twice and then tossed. The baby I was paired with was born in early May and as soon as I knew who I was paired with, I knew what I would make her.

I had been thinking about making one of these signs for some time now but just never got around to it. I'm so glad I was involved in this birthday swap so I could put my crafting skills to work again. It felt good to get back in the craft room after taking a long break. I don't think I had been in there crafting but one or two times since our daughter was born.

For this project, I cut a piece of cardstock down to 8 x 10 and then used some scraps to plan out the little squares. I knew this baby's nursery was done in girly colors and her theme was classic Pooh. I couldn't get the Pooh characters to come out right for this project so I just went with a pretty design. I'm very happy with the end result and I think the recipient liked it, as well.


I used all Close To My Heart products for this project including the Chantilly paper pack and bitty opaque pearls. My friend Cecilia took the Chantilly paper and used her button maker to make the buttons seen at the top right and center left. I found a shadowbox at Michaels that worked perfectly for this project. The paper is pinned to the back of the shadowbox with pins that came with the frame. It took some serious packing supplies to make sure this didn't break on its way to the birthday girl but, it arrived in one piece and on the day of her party!

I have made one of these before this one but I forgot to take a picture of it before I sent it off! This project didn't take too long to make. The hardest part for me was figuring out what decorations to use once I had the paper glued down and the name in place. 

I would really like to make one of these for our girl someday. Maybe once I'm done with her party planning, I'll get back in there and put one together for her, as well.

Monday, June 3, 2013

Daycare Meals (Reposted)

(Originally posted on another blog. Reposting for reference.)

It's been a while since I've talked about daycare foods. I haven't talked about it because it's been going so well! I have been sending food for her to daycare every day. I started by sending a puree to daycare for lunch. After a while, we added more meals and more solid foods into the mix. My daycare has been really great about letting me send my own food for her. They provide food but I would prefer to send the meals that I put together just because I know what's in them and (to be perfectly honest) they're healthier.

I'll start with the packaging. I FINALLY found a tupperware set I was happy with to send her food in. I was sending her food in random tupperware containers and silicone cupcake liners to keep things separated. Now that she is eating more, I need more space for her food. I was in Target one day looking for new tupperware for us when I found this:

source

It's perfect!! I put breakfast and snack in the top containers. Lunch goes in the bottom container. I send her with 3 or 4 options for lunch and put them in silicone cups. On good days, she eats everything and drinks all of her milk. On okay days, she will skip a meal. On bad days, she will eat very little and won't even drink well.

Speaking of drinking....Pearl is 11 1/2 months old. I want her off of bottles by 1 year. We are transitioning from bottles to straw cups at daycare already. She currently gets 2 bottles and 1 straw cup of milk along with her food. I ran through all of the formula we had so I decided it was time to start using up my breastmilk freezer stash. As of today, I have 10 5oz bags of milk left. TEN bags. 2 months ago, reading that would have freaked me out. Now I think it's just about perfect. I am still pumping and pump anywhere from 4 to 12 ounces a day depending on sessions and general output.

I am mixing whole milk into the sippy cup with breastmilk. At this point, she gets 2oz of breastmilk and 2oz of whole milk in the sippy. I'm going to start adding whole milk to her bottles and transition her to 1 bottle, 2 cups sometime late next week. The plan is, once I'm out of my freezer stash, I will just give her the milk I pump. I'll keep pumping until I get her down to just whole milk in the straw cups. I Can.Not.Wait to be pump-free!

Back to food...here are Pearl's last two daycare meals:

Breakfast - Scrambled eggs and greek yogurt
Lunch - Corn, chicken with mayo and taragon, peas and oranges
Snack - Cheddar penguins and string cheese


Breakfast: Greek yogurt and banana
Lunch: Peas, oranges, meatball, broccoli
Snack: String cheese and natural applesauce

For dinner, she normally has leftovers or what we are eating for dinner which look something like her lunches. I actually enjoy making her meals every day. I try to be creative but find there is a limit to the items I can send for her. If nothing else, I break up the chicken monotony by using mayo or soy sauce. She likes to eat. That makes this Mom very happy.

What is your baby eating these days?

Tuesday, May 28, 2013

Welcome!!

Hi there!

You may have found my blog from that other one I had or you may have found me through the web somehow. Either way, welcome! I decided to take most of the personal posts private but keep my fun, hopefully helpful posts public by transitioning to a new blog. I'm going to move some of my favorite posts from my old blog over here and change the names of some people you will recognize from my old blog to make us a little more annonymous.

I'll get around to making the blog prettier someday. For now, I just want somewhere to post my projects and baking adventures for you to see. They were the reason I started my blog in the first place!

Whether you're a new friend or an old one, welcome! Thanks for following.